This week's Ruby Quiz is to create a tool that will allow you to preview an image file at the command-line in pure text.
Your program will need to read in an image, in whatever format you want to support, and respond with a text representation of the image that fits in the terminal.
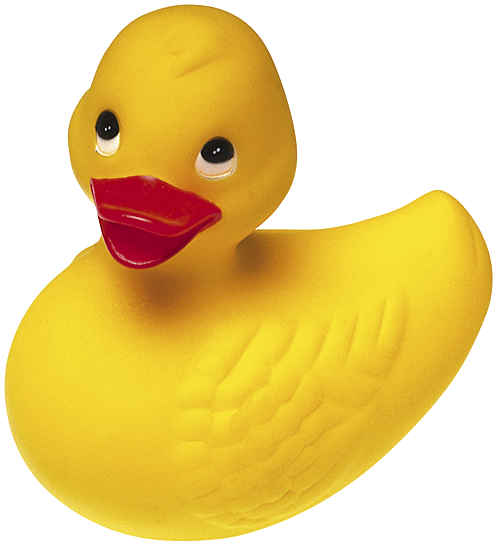
For example, given the image:
Your program might respond with something like:
........--**####**::::::::::::........
......--##oooooo\\**::::::::..........
......**oo==oooo\\\\::::..............
....--\\oooooooo\\$$**::..............
....**&&$$oooo\\$$$$%%................
....**\\oooo\\<<<<$$##................
....!!<<<<<<<<<<\\\\##..........::::::
....::%%<<<<<<<<\\$$^^....::**++**....
....^^%%<<<<<<<<$$$$##**""==++++==****
....**oo<<<<<<$$<<<<\\oo==++++++==""""
..!!==oo<<<<<<<<$$$$oo====++++==oo####
^^====oo\\<<$$\\oooooo==++======oo****
**++++====oooo====++++======oooo\\^^^^
++====++++========++======oooooo**....
""====++++==========oooooooooo##--....
""==================oooooooooo^^......
!!oo==oo======oooooooooo\\##^^::......
..""oooooooooooooooo\\oo""^^..........
..::**====oooooooooo==**::............
....::^^**""""""""!!..--::............
....::^^**""""""""!!..--::............
Go for as much accuracy as you can possibly squeeze out of it.
Quiz Summary
I just love it when a totally crazy idea of mine blossoms into a popular quiz. Who would a thunk it?
As you've probably seen from the solutions, this quiz turns out to be fairly easy, thanks to great tools like RMagick and GD. Those libraries can do the heavy lifting of loading an image, resizing it, and dropping it to a smaller color map. With that, you're code just needs to replace colors with some symbols.
Here's some RMagick code from Mr. RMagick himself, Timothy Hunter:
CHARS = [ 'W', 'M', '$', '@', '#', '%', '^', 'x', '*', 'o', '=', '+',
':', '~', '.', ' ' ]
FONT_ROWS = 8
FONT_COLS = 4
img = Magick::Image.read(ARGV[0] || "Flower_Hat.jpg").first
# Resize too-large images. The resulting image is going to be
# about twice the size of the input, so if the original image is too
# large we need to make it smaller so the ASCII version won't be too
# big. The `change_geometry' method computes new dimensions for an
# image based on the geometry argument. The '320x320>' argument says
# "If the image is too big to fit in a 320x320 square, compute the
# dimensions of an image that will fit, but retain the original aspect
# ratio. If the image is already smaller than 320x320, keep the same
# dimensions."
img.change_geometry('320x320>') do |cols, rows|
img.resize!(cols, rows) if cols != img.columns || rows != img.rows
end
# Compute the image size in ASCII "pixels" and resize the image to have
# those dimensions. The resulting image does not have the same aspect
# ratio as the original, but since our "pixels" are twice as tall as
# they are wide we'll get our proportions back (roughly) when we render.
pr = img.rows / FONT_ROWS
pc = img.columns / FONT_COLS
img.resize!(pc, pr)
img = img.quantize(16, Magick::GRAYColorspace)
img = img.normalize
# Draw the image surrounded by a border. The `view' method is slow but
# it makes it easy to address individual pixels. In grayscale images,
# all three RGB channels have the same value so the red channel is as
# good as any for choosing which character to represent the intensity of
# this particular pixel.
border = '+' + ('-' * pc) + '+'
puts border
img.view(0, 0, pc, pr) do |view|
pr.times do |i|
putc '|'
pc.times { |j| putc CHARS[view[i][j].red/16] }
puts '|'
end
end
puts border
That is wonderfully commented code, of course, so I'm not going to repeat what it does here.
I will mention a trick I found while playing with my own similar solution though. I couldn't decide how many symbols to use, so I played with different amounts. After about the third time of changing the Array and the argument to quantize(), I realized that I could save myself a step. The same can be done with the above code by changing two lines:
img = img.quantize(CHARS.size, Magick::GRAYColorspace)
# ...
pc.times { |j| putc CHARS[view[i][j].red/CHARS.size] }
# ...
With that, you can add and remove CHARS to play around and the code will just do the right thing.
Here's how our mascot looks, when hit with the above code:
+-------------------------------------------------------------------------+
| .::+====+:: |
| .:==o======ooo*oo+. |
| +oo=====++++===oo***+ |
| :oo==++++===++==ooooo*^*. |
| :oo====++++====oooooooo*^* |
| .oo=====++++========ooo**^^o |
| .ooo=====++++++======ooo**^^%: |
| :*oo*o==============oooo****^^^. |
| :ooo$WW^===========oooo****^^^^^= |
| ooo*WWW%=========oooo^^*^**^^^^^^ |
| oooo=o::o=====oooo*%WWW$^^*^^^^*^: |
| =ooo=:+====ooooo**o^WWW$***^****^: |
| .*o*o*ooooo==ooo*^*+====o*^*****^. |
| :o%$$$$$WW$$$%%^^^^**********^^= |
| .oWWWWWWWWWWWWWW$%%^**o****^^= :::::: |
| %$$$$$$$W$$W$WWWW$^****^^o. ...::::::::==: |
| =WWWW$$$W$$$$WW$$%^^****+. .........:::::::::::::::::=o+ |
| :$WWWWWWWWWWWW%^****^%%%%%^^**oo====++:::::::::::::::+=o+ |
| :+oo*$$WWWWWWW$%^*^^^^^%$$$%%%^**o===+:::::::::::::::::++==o: |
| .:====o*^%$$$$$%^^%%^^^^%%%%%%%^^**o===+::::::::::::::::::===oo |
| .:+++++==o*^%%%%%%$%%%%^^^^%%%^^^**oo===++:::::::::::::::::+==ooo |
| .:+::::+++=oo*^%%%$%%%%%^^^^^*****ooo===+++::::::::::::::::++===oo= |
| :++::::::+++=oo*^%%%%%%^^****ooooo=====++:::::::::::::++:::++====o*. |
| :+::::::::::+===o**^^^^**ooo=====+=+++++::::::::::::+::==++++===ooo+ |
| :+::::::::::::+++==oooooo====+::::+:::::+::::+::++::+::+==++=====oo= |
| .+::::::::::::::::++=+=====+::::::+:::::+::::+:::+:::+++========ooo= |
| :+::::::::::::::::::+:++++::::::++::::::::::+:::++:++==========ooo+ |
|.++++:::::::::::::::::::::::::::+:::::+::::+:::++++===========oooo: |
|.++++::::::::::::::::::::::::::::::++:+::+=+++==============oooo=. |
| +++++++::::::::::::::::::::::++::++::+==+=+===========o===ooo=: |
| :==++++::::+:::::::::+:+:::::::::+++===++=============ooooo=: |
| .===++++++++++::+++::+++:+++++::+===++====o==========o=o==:. |
| :=======+++++++++++++++++:++===============oo====oo=o==:. |
| :====================++++++==+=========o=====ooo====: |
| .==================================ooooooo=oo===+: |
| :+=============================oooo=o==oo==::. |
| ::==========================o====oo===::. |
| ::++==============+===========+::. |
| ..:::++++==++=+++++++++::.. |
| ....:.::::::... |
+-------------------------------------------------------------------------+
For an interesting different approach, Simon Kroeger wrote some code to outline the primary subject. That makes our duck look like this:
.:'''''''.
.: :.
.: :.
: :
:' ':
.: :
: .':. ::
:'.' : .. ':
: :..' :' ': :
:. ' : .: :
': '::'':.. ':' . :
:: ''.. :' .:'':.
:: . ': .: ..' . '.
': ''''' .: .:::::''' :.
:: .:': :
.: : .:' :
.' '' '' :
:' :
: :
.' :
: ' :'
: .:
' : .:
' :
: .:
: .:
: .'
'. :'
:. .'
'. .:'
':. .:'
':. .:'
''..........''
I thought that was a surprising variation that got a great amount of detail across. The bill is probably the easiest to make out here, compared with all the solutions.
Let's see the code for that:
require 'generator'
require 'enumerator'
puts "Usage: #{$0} <img> [size]" or exit if !ARGV[0]
img, size = Magick::ImageList.new(ARGV[0]), (ARGV[1]||40).to_f
factor = [size*1.5/img.rows, size/img.columns].min
img.resize!(img.columns*factor, 2*(img.rows*factor*0.75).round)
img = img.edge.despeckle.despeckle.normalize.threshold(50)
pixels = img.get_pixels(0, 0, img.columns, img.rows).map{|c| c.red.zero?}
pixels.to_enum(:each_slice, img.columns).each_slice(2) do |l|
puts SyncEnumerator.new(*l).map{|p1, p2|
[' ', "'", ".", ":"] [(p1 ? 0 : 1) + (p2 ? 0 : 2)]}.join('')
end
Here we see RMagick used again to read in the picture and resize it to something closer to terminal dimensions. Instead of dropping the color map here though, we get an interesting chain of filters designed to draw out the edges of the primary subject. (Obviously, this works better on some images than others.)
What's after that? I honestly had no clue. to_enum(), each_slice(), SyncEnumerator? Did I switch languages and nobody told me? Obviously those two harmless looking requires at the beginning of the program change some of the rules and we're going to need to learn a little bit about "generator" and "enumerator".
So, what's the first step? I tried http://www.ruby-doc.org/ because I'm a wimp. Yep, there's "generator" but we're in trouble with "enumerator". No documentation! I clicked the link anyway, to see what I could learn.
Seems each_slice() is added to Enumerable by the library and it expects one argument. Well, that's something. It's a little hard to tell how it's being used in Simon's code (complicated by to_enum()), so I figure, just put something in an Array and try to call it. That should tell us something. irb to the rescue!
>> require "enumerator"
=> true
>> pixels = (1..10).to_a
=> [1, 2, 3, 4, 5, 6, 7, 8, 9, 10]
>> pixels.each_slice(2) { |slice| p slice }
[1, 2]
[3, 4]
[5, 6]
[7, 8]
[9, 10]
=> nil
Perfect! That was all we need to see. It allows you to take off chunks of an Array, it seems. Dang that's cool! Why didn't any of you tell me that was there?!
Anybody see the Tic-Tac-Toe code posted to Ruby Talk on Tuesday? Look how simple drawing the board can be:
>> board = Array.new(9) { rand > 0.5 ? "X" : "O" }
=> ["X", "O", "O", "O", "O", "O", "O", "X", "O"]
>> board.each_slice(3) { |row| puts row.join }
XOO
OOO
OXO
=> nil
Okay, we've got each_slice() figured out. Let's do some more detective work. Let's see if we can figure out to_enum(). When it is called in Simon's code it seems to get passed a method name (the one we just learned!) and a number. Well, we know each_slice() requires a number, so maybe that's the argument to it? Again, let's just see if we can call it:
>> pixels
=> [1, 2, 3, 4, 5, 6, 7, 8, 9, 10]
>> enum = pixels.to_enum(:each_slice, 2)
=> #<Enumerable::Enumerator:0x342b58>
Well, we got... something. Hmm, I wonder what it can do?
>> enum.methods
=> ["reject", "method", "send", "object_id", "enum_for", "singleton_methods",
"member?", "__send__", "equal?", "taint", "find", "frozen?",
"instance_variable_get", "each_with_index", "enum_cons", "kind_of?", "to_a",
"instance_eval", "collect", "all?", "entries", "type", "enum_with_index",
"protected_methods", "extend", "detect", "eql?", "display", "zip",
"instance_variable_set", "hash", "is_a?", "map", "to_s", "any?", "sort",
"class", "each_slice", "min", "tainted?", "private_methods", "find_all",
"untaint", "each", "id", "inspect", "inject", "==", "===", "sort_by", "clone",
"public_methods", "enum_slice", "max", "respond_to?", "select", "freeze",
"__id__", "to_enum", "partition", "=~", "methods", "grep", "nil?", "dup",
"each_cons", "instance_variables", "include?", "instance_of?"]
Okay, it seems to be Enumerable. Let's just see what each entry is:
>> enum.each { |e| p e }
[1, 2]
[3, 4]
[5, 6]
[7, 8]
[9, 10]
=> nil
Now I get it. We turned an each_slice(2) call into an each() call. That's interesting.
It always bugs me that Strings iterate over lines instead of characters, by default, and now I have the tool to fix it:
>> char_str = "team".to_enum(:each_byte)
=> #<Enumerable::Enumerator:0x322d30>
>> if char_str.any? { |c| c == ?i }
>> puts "Huh?!"
>> else
?> puts "There's no I in T-E-A-M!"
>> end
There's no I in T-E-A-M!
=> nil
>> char_str.to_a
=> [116, 101, 97, 109]
Notice how I was able to use any?() and to_a() there, because we switched each_byte() to each() and all other Enumerable methods use each().
One more mysterious piece of the puzzle, but this one is documented, which almost takes all the fun out of it. Here's the example right out of the documentation, minus some irb noise:
>> require "generator"
=> true
>> s = SyncEnumerator.new([1, 2, 3], %w{a b c})
=> #<SyncEnumerator:0x1b339c ...>
>> s.each { |row| puts row.join(", ") }
1, a
2, b
3, c
=> #<SyncEnumerator:0x1b339c ...>
Obviously, that just let's you traverse two Enumerable objects at once. First you get the first entry of both, then the second, etc. Nothing too tricky there.
Still remember the code that started all this?
pixels.to_enum(:each_slice, img.columns).each_slice(2) do |l|
puts SyncEnumerator.new(*l).map{|p1, p2|
[' ', "'", ".", ":"] [(p1 ? 0 : 1) + (p2 ? 0 : 2)]}.join('')
end
This code iterates over rows of pixels (pixels.to_enum(:each_slice, img.columns) ...), two at-a-time (... .each_slice(2) ...). It then traverses those two rows pixel-by-pixel in tandem (SyncEnumerator.new(*l).map{|p1, p2| ... }), averaging the two on/off values (... [' ', "'", ".", ":"] [(p1 ? 0 : 1) + (p2 ? 0 : 2)] ...), and printing the results (puts ... .join('')). Work through that slowly, until it sinks in. I know it took me a couple of tries.
I better wrap this up, since it's already quite lengthy, but don't forget to take a peek at the other solutions. Harold Hausman rolled his own code for analyzing bitmap images and others are now golfing that solution on Ruby Talk. Rob Rypka and Brian Schroeder also did some sensational work mapping colors to characters, producing some nice gradients.
A big thank you to all the enlightening solutions to this week's quiz. The combined intelligence of the Ruby Quiz community is beyond measure.
Tomorrow, I have a new game for you. I figure it's The RubyConf Collective verses the rest of us in the tournament, right?